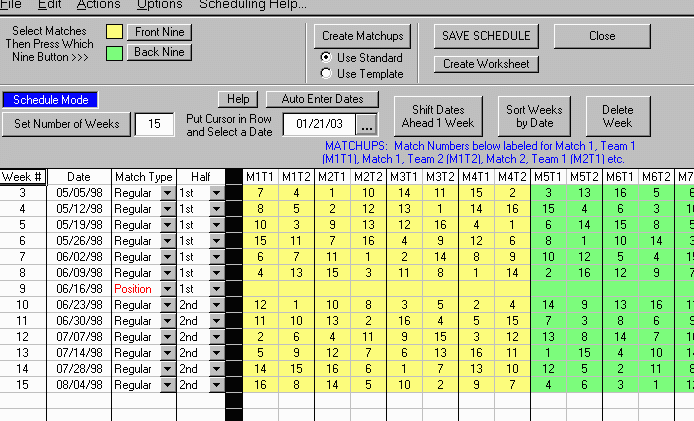
Schedule Setup
Within Schedule Setup (See Figure 1), you can set the Dates for the matches; set the Date
Type (Regular or Position Round); set which Season (1st Half or 2nd
Half), and set the Team or Player Matchups. You can create
the initial
schedule or you can edit an existing schedule, such as for rainouts or
cancellations.
- Click on the "Schedule Setup" button on the "Setup Toolbar, or from the
"Setup Menu." GLS Schedule Maker displays a grid showing the week number; the Date; the Date Type (i.e. whether it is a Regular Round or Position Round); and the Player or Team Matchups. M1T1 is Match Number 1 Player or Team Number 1; M1T2 is Match 1, Player or Team 2; etc.
- The first task, if not already set, is to set the Number of
Weeks in the league. Count only Regular and Position
Rounds. GLS cannot handle "non-counting" matches such as
"Fun Nights." Enter the number of weeks in the box
provided then click the "Set Number Of Weeks"
button. GLS will automatically create a row (record) for each week.
- Next, set the Dates for each match. This can be
accomplished by either typing in the date in the date column or selecting
a date from the date text box using the "pop-up" calendar.
As a convenience, you can set any date, then press the "Auto Enter
Dates" button to fill in all dates below that date. These dates
will be set 7 days apart. If this feature does not work click the
Help button on the schedule setup form for more information about
dates. After the dates are set...
- Set the Date Type for each week. This can be either
"Regular," "Position" Round, or "Final Position Round." The Final Position Round is a special round which can
only occur the very last week of a league and can only be used in leagues
which have a first and second half. The Final Position Round is not
part of the 1st or 2nd half, it is separate, and is usually used to figure
an overall champion(s). If you want the position round points to
count toward the 1st or 2nd half select "Position Round,"
not "Final Position Round."
- Next, select whether or not the week is part of the 1st or 2nd Half
of the Season. All 1st's must occur before any 2nd's
appear. If you do not have season halves, then disregard
this column.
- Click on "Create MatchUps" to generate a proposed schedule representing each team opposing all teams
at least one time. For 4 and 6 (players or teams) the proposed schedule has each player or team opposing each other 3 times. For 8 and 10 (players or teams), the sample schedule has each team playing all others twice.
If GLS does not fill in all the matches, you will have to manually insert
the matchups. You can copy matches from filled-in rows above into
blank rows below. Leave Position Round Blank.
These matchups will be determined by the League Standings at the time of
the match.
- Keep the proposed schedule or Edit the proposed schedule. You can change the matchups to your specifications. Make sure your revised schedule is correct.
In other words, don't have the same team playing twice in the same week.
It will cause problems (errors) later! GLS disregards any data or
typing entered below the last week of the schedule. Sometimes
matches will be pasted below the last week of the schedule. This
will happen for sure if you do not play enough weeks to play each team at
least one time.
- Select Which Nine Color Code. For 9-Hole Leagues or Leagues at Courses with more than 18 holes, you can select which nine each match will be played. Select the matches that will be played on the Front Nine and then click on the button labeled "Front Nine." You will notice that the cells will be the same color as the Front Nine button label. Open a sample league schedule to get an idea of
how this works. The results of this procedure, that is, which nine each
match is played on is stored in the table "SchedNine" for the league. Look at this table to see how it is organized.
- Click on "Save to Database" to accept the schedule. Click on "Save as Spreadsheet" to create a copy to be printed or viewed.

Figure 1 - Schedule Mode
Some Tips: The easiest way to set the schedule, of course, is simply to accept the default proposed schedule provided.
You can come back to Schedule Setup at any time to make changes. In fact,
this is how you edit the schedule for rainouts or
postponements or cancellations. You can also Add Weeks to the
schedule. Simply increase the number of weeks in the Number of Weeks
Box and click "Set Number of Weeks." This will add a row or rows
to the bottom of the schedule. You can now fill the dates and other
necessary data for the new weeks. Week Numbers are the critical factor in the schedule.
Always keep weeks in consecutive order. You can change the date...but don't change the week number.
Don't skip a week number.
You will notice that after you have played 1 or more weeks and go into
"Schedule Setup,." the weeks already played do not appear on the
schedule. Once a week is in the books you cannot edit that weeks
schedule. The date has already past, the matches were already played...
there is nothing to change. The "missing" weeks did not
disappear, they are still in the database. If you were to "Delete
Last Scores Posted," in other words delete the last week played, then open
'Schedule Setup"... That week would miraculously appear...

